Thursday 1 December 2016

Arduino not getting detected, USB2.0-Serial issue

Since Arduino hardware is open source, it is manufactured and marketed by different vendors. If you have ordered a cheap Arduino clone from a chinese makers like Luxshare Precision Ltd, chances are that they come with the cheaper CH340 USB to Serial chip. This is a cheap chip that manufacturers exploit to make the clone a lot cheaper. This can also be a downside. When you connect this device to Windows XP/7/8 systems you will end up with the message “USB 2.0 serial driver is not installed properly” and if you go to “Computer(right click) -> Manage -> Device manager ->Portable Devices”, you will see the following:


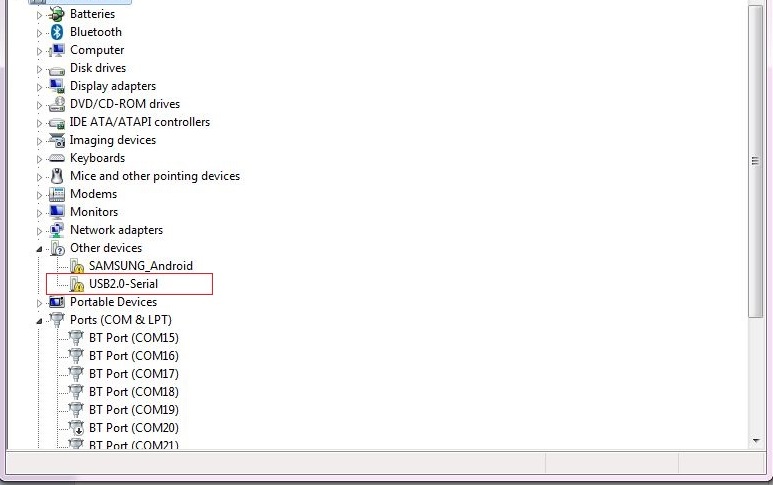
This is because there are no proper USB drivers (like CH340) to detect portable devices on COM ports.

Solution:
To solve this you just have to install CH340 driver (download here).
Extract this download and install by double clicking on SETUP.EXE
After installation you will see a COM port assigned to the Arduino board attached to your USB port as below: (Computer (right click) -> Manage -> Device manager ->Portable Devices)


Now if you go to Arduino IDE we can see the COM number port to which Arduino is connected.


 Now try loading any example sketch (like Blink).  Enjoy…!!!!

Wednesday 19 October 2016

Producer - consumer problem implementation in Linux


Producer consumer problem is one of the very familiar synchronisation issue to be solved by any RTOS.

The following code simulates the producer consumer problem in Linux environment which involves a producer thread generating random values () at particular rate.

The consumer thread utilises the values generated by producer at a certain rate.

Since the producer sleeps for long time and consumer sleeps for less time, the produced data are not consumed in sequence.


#include <pthread.h>
#include <stdlib.h>
#include<stdio.h>
#define N 20
int buffer[N];
void *producer(void *thread_args)
{
     int j,x;
while(1){
     for (j=0;j<N;j++)
     {
           //printf("am producer\n");
           buffer[j]=j+10;
           printf("produced : buffer[%d]=%d\n",j,buffer[j]);
           for(x=0;x<500000000;x++);
     }
     return NULL;
}
}
void *consumer(void *thread_args)
{
     int i,y,value;
     for(i=0;i<N;i++)
     {
           //printf("am in main thread\n");
           value=buffer[i];
           printf("consumed : buffer[%d]=%d\n",i,value);
           for(y=0;y<800000000;y++);
     }
     return NULL;
}

int main()
{
     int i=0,y,value;
     pthread_t tcb1,tcb2;
     if (pthread_create( &tcb1, NULL, producer, NULL))
     {
           printf("error1\n");
           return -1;
     }
     if (pthread_create( &tcb2, NULL, consumer, NULL))
     {
           printf("error2\n");
           return -1;
     }
     pthread_join(tcb1, NULL);
     pthread_join(tcb2, NULL);
     return 1;
}


 The above code (tth.c) can be compiled and executed as follows:
             gcc tth.c tth.o –lpthread
             ./tth

Working of above code is as below:

Saturday 15 October 2016

POSIX Thread Creation

The following code demonstrates creation of threads using POSIX thread libraries in Linux environment.

#include <pthread.h>
#include <stdlib.h>
#include<stdio.h>

///////function for thread-1 /////////////
void *new_thread1(void *thread_args)
{
     int i,j;
     for (j=0;j<10;j++)
     {
           printf("am in new thread-1\n");
           for(i=0;i<500000000;i++);
     }
     return NULL;
}

///////function for thread-2 /////////////
void *new_thread2(void *thread_args)
{
     int i,j;
     for (j=0;j<10;j++)
     {
           printf("am in new thread-2\n");
           for(i=0;i<500000000;i++);
     }
     return NULL;
}

///////main thread /////////////
int main()
{
     int i,j;
     pthread_t tcb1, tcb2;
     if (pthread_create( &tcb1, NULL, new_thread1, NULL))
     {
           printf("error\n");
           return -1;
     }

     if (pthread_create( &tcb2, NULL, new_thread2, NULL))
     {
           printf("error\n");
          return -1;
     }

     for(j=0;j<10;j++)
     {
           printf("am in main thread\n");
           for(i=0;i<800000000;i++);
     }
     pthread_join(tcb1, NULL);
     pthread_join(tcb2, NULL);

     return 1;

}

Here the pthread_create() function is used to create child threads along with following parameters:

·         tcb:  a structure which holds fields of the newly created thread (tcb1).
·         task_function:  pointer to a function which does the actually task of the child thread (new_thread1).


The pthread_join function monitors the termination of child threads and returning the control to parent thread.

The above code (tth.c) can be compiled and executed as follows:

         gcc tth.c tth.o –lpthread
        ./tth

Working of the above code is as below:

Saturday 8 October 2016

ADE Lab Experiment 11: Generate a Ramp output waveform using DAC0800.

Generating a Ramp output waveform using DAC0800 (Inputs are given to DAC through IC74393 dual 4-bit binary counter).

Circuit Diagram:

In the above configuration the DAC 0800 produces output voltages at EO and EO’ terminals as follows:


The output voltages obtained for some of the individual counts are as follows:


Procedure:

  •   Rig up the circuit as shown in the diagram with proper power supplies in a trainer kit. 
  •   Keep the MSB bits in a suitable required value using toggle switches (eg: 0110 = 9)
  •  Feed the LSB bits from the 4 bit counter which counts from 0000 to 1111. 
    •  (Alternatively we can construct a full 8bit counter using 74LS393)
  •   Supply a 1KHz clock to the counter and observe the ramp output on CRO.
  • Voltages for individual counts can be measured in a voltmeter by applying mono pulses to the counter.
Calculations: 

           Output voltages can be theoretically calculated using following formula:
Output: 
           The output wave form obtained (for counts 96 to 111) is as shown below-


Need any help ..? 
Please Contact:     nageshub@gmail.com / nageshub.ise@vcetputtur.ac.in